

Most women think eyeshadow is the hardest part of makeup — but they’re approaching it backwards. After years of working with clients who’d arrive with Instagram tutorials screenshotted on their phones, asking why their eyes looked nothing like the model’s, I realized the problem wasn’t their technique. It was that they were starting with colour instead of understanding their eye shape first.
I learned this the hard way when I spent an entire evening recreating a smoky eye tutorial, only to realize it made my hooded eyes disappear completely. The tutorial was beautiful, but it was designed for someone with completely different eye anatomy than mine. That night changed how I approach eye makeup — and how I teach it. For more ideas, see Pro Makeup Tips.
The secret isn’t having expensive brushes or twenty different eyeshadow palettes. It’s understanding the basic map of your eye and working with your natural features instead of against them. Once you know where to place colour and why, even the simplest two-shadow look becomes more polished than any complicated tutorial you’ll find online.
How to Apply Stylish Eye Makeup with Ease
Master Your Eye Map First
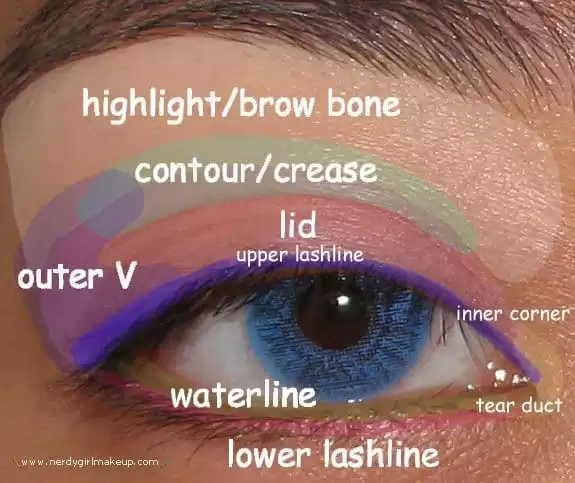
Understanding the anatomy of your eye area is crucial before applying any makeup. This comprehensive guide shows exactly where each product should be placed — from the highlight on your brow bone to the precise location of your waterline. Most women skip this step and wonder why their eyeshadow looks muddy or uneven.
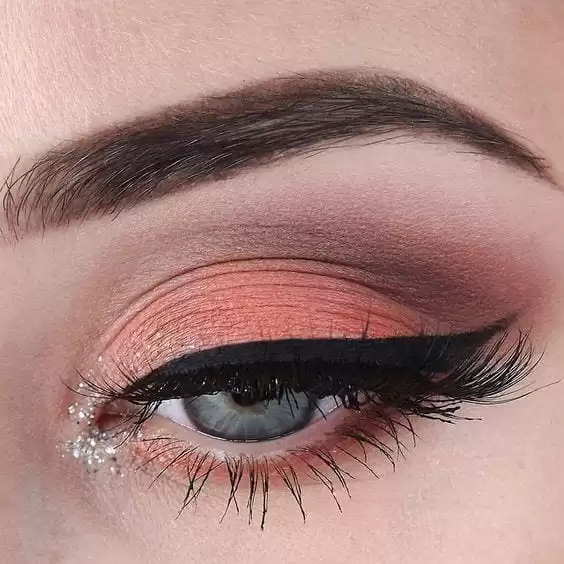
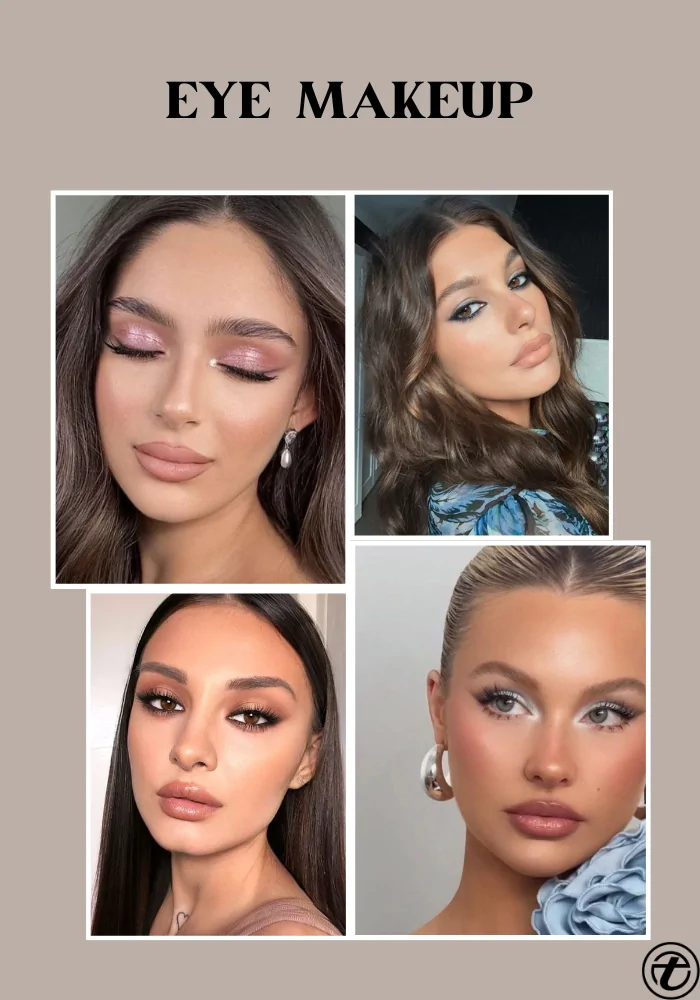
Perfect the Coral-Toned Smoky Eye
Coral and peach tones are incredibly flattering on most skin types because they complement the natural warmth in our complexion. This look demonstrates how to build depth gradually, starting with lighter coral on the lid and deepening to burgundy in the crease. The key is keeping the colours in the same warm family.
Build Bronze Drama Strategically
This bronze smoky eye shows exactly how metallic shadows should be applied — with the most intense colour concentrated on the mobile lid where it catches light best. Notice how the darker browns are used sparingly in the outer corner and crease, creating depth without overwhelming the metallic finish.
Makeup with Hijab – Simple Tutorial with Tips

Eid Makeup Tutorial 20 Perfect Makeup Ideas

Complete Guide on How to Wear Hijab Underscarf & Tutorials

41 Stylish Outfits to Wear with Long Boots This Season

What To Wear To Engagement Shoots? 20 Stylish Outfit Ideas

How to Wear a Hijab? Step by Step Tutorials and 35 Styles

How To Wear Sheer Skirts? 29 Stylish Outfit Ideas

18 Stylish Outfits to Wear with Oxford Shoes
Layer Dramatic Colours in Steps
Complex eye looks become manageable when broken down into clear steps. This tutorial shows how to build from a sparkly base to blended neutrals, then add drama with darker colours. Each step has a specific purpose — the base creates adhesion, the neutrals provide transition, and the dark colours add depth.

Create Subtle Shimmer Effects
Not every eye look needs to be dramatic. This technique shows how to add just enough shimmer to make your eyes appear larger and more awake. The secret is applying metallic shadow only to the inner third of the lid and blending it seamlessly into matte shadows.

Master the Classic Winged Liner
The perfect winged liner follows your lower lash line upward — this creates the most flattering angle for your specific eye shape. Notice how the wing extends outward rather than upward, which prevents the droopy effect that happens when you angle the wing too high.

Execute Silver Smoky Eyes Properly
Silver eyeshadow can look chalky if applied incorrectly, but this step-by-step method ensures smooth application. The trick is using a tacky base, building the silver gradually, and always warming the outer corners with complementary greys to prevent the flat, one-dimensional look.
Ancient Egyptians used ground beetles and lead to create the dramatic black eyeliner we associate with Cleopatra. Modern kohl pencils achieve the same intense pigmentation much more safely with iron oxides and waxes.

Apply Minimal Liner for Maximum Impact
Sometimes the most sophisticated eye makeup is the most restrained. This look proves that a thin line of black eyeliner and well-groomed brows can be more striking than elaborate eyeshadow. The key is making the line as close to the lashes as possible to avoid gaps.

Warm Up Eyes with Golden Tones
Golden eyeshadow makes every eye colour appear more vibrant, but it needs to be applied with precision. This technique shows how to concentrate the gold on the center of the lid while using deeper browns to frame the eye shape. The result is warmth without looking overdone.

Enhance Green Eyes with Complementary Colours
The colour theory behind this look is flawless — the soft greens and golds enhance the natural green in the eyes while the brown depths prevent the colours from competing. This demonstrates why understanding complementary colours matters more than following trends.

Create Romantic Purple Looks
Purple eyeshadow can easily look bruised if not applied correctly. This tutorial shows the right way — building from light lilac to deeper plum, always keeping the darkest colours in the outer corner. The gradient technique is what makes purple eyeshadow wearable for daytime.

Execute Modern Emerald Drama
Bold green eyeshadow requires confidence and precision. This look works because the green is concentrated where it has the most impact — on the lower lash line and outer corner — while neutral tones balance the intensity on the upper lid.

Draw Inspiration from Nature
This peacock-inspired look demonstrates how to translate dramatic colour inspiration into wearable makeup. The key is using the bold colours as accents while maintaining neutral tones as your base. Gold bridges the gap between the dramatic blue and everyday wearability.

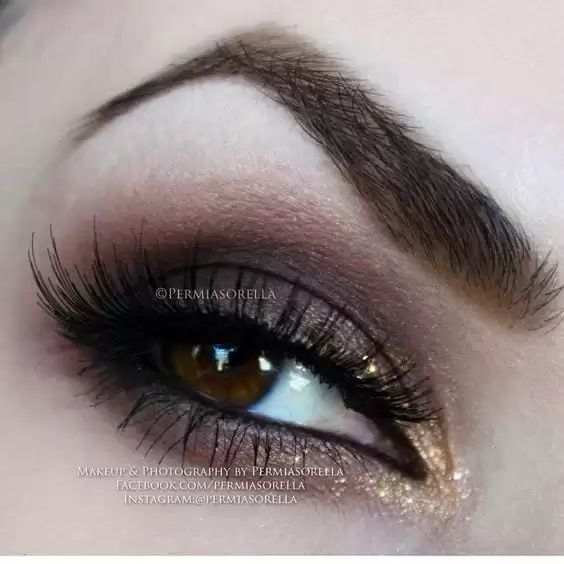
Master Classic Brown Smoky Eyes
Brown smoky eyes are universally flattering because they enhance your natural eye colour without competing with it. This step-by-step method shows how to build depth gradually, always working from light to dark and blending thoroughly between each step.

Execute Dramatic Blue Statements
Blue eyeshadow intimidates most women, but applied correctly, it’s incredibly striking. This look works because the blue is grounded with black and brown tones that prevent it from looking costume-like. The key is treating blue as an accent, not the dominant colour.

Perfect Navy Smoky Techniques
Navy blue is more wearable than bright blue because it reads almost as a neutral while still providing impact. This tutorial shows how to build a navy smoky eye using the same techniques as a black smoky eye — the colour is different, but the placement principles remain the same.

Create Vibrant Multi-Colour Looks
Using multiple bright colours requires careful planning to avoid a muddy result. This technique shows how to keep each colour distinct while still blending them seamlessly. The secret is using a light hand and building each colour separately before blending the edges.

Balance Current Trends Thoughtfully
These modern eye looks demonstrate how to incorporate current trends without looking dated in photos later. The key is using trendy colours in classic placements — the techniques are timeless even when the colour palette feels contemporary.
Dos & Don’ts
Makeup with Hijab – Simple Tutorial with Tips
Eid Makeup Tutorial 20 Perfect Makeup Ideas
Complete Guide on How to Wear Hijab Underscarf & Tutorials
41 Stylish Outfits to Wear with Long Boots This Season
What To Wear To Engagement Shoots? 20 Stylish Outfit Ideas
How to Wear a Hijab? Step by Step Tutorials and 35 Styles
How To Wear Sheer Skirts? 29 Stylish Outfit Ideas
18 Stylish Outfits to Wear with Oxford Shoes


