My cousin’s henna artist made one simple change that completely transformed how I think about mehndi — she started treating it like temporary tattoos instead of traditional patterns. Instead of covering my palms with intricate swirls, she placed single, bold motifs exactly where real tattoos would sit. The result was modern enough for my London office but rooted enough for my mum’s approval.
This shift from traditional full-coverage mehndi to strategic tattoo-style placement has revolutionised how we wear henna. I’ve watched friends get delicate wrist designs that last through board meetings and shoulder pieces that peek through Western tops. The art stays the same — it’s the approach that’s changed everything.
How to Make Tattoo Mehndi Designs
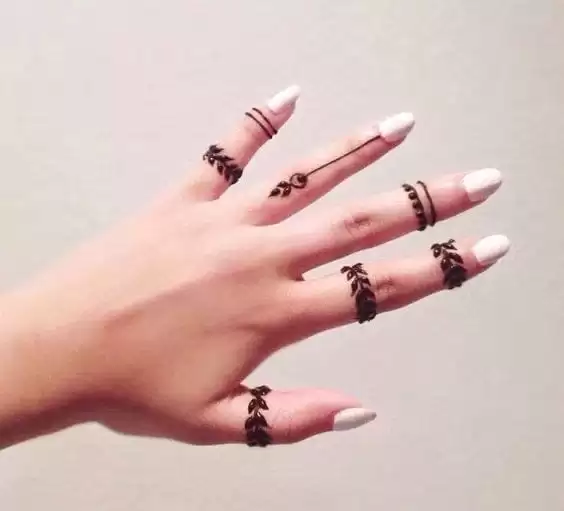
Master finger ring patterns
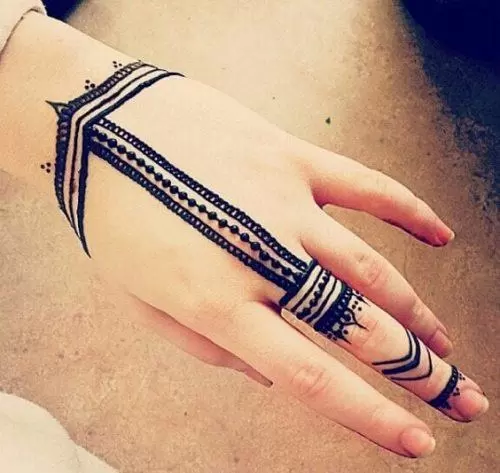
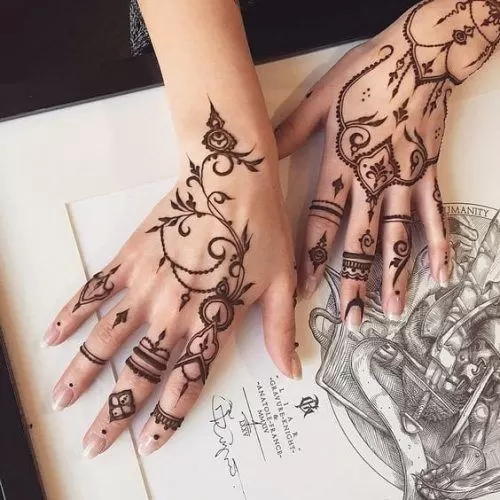
These delicate bands around each finger create the illusion of multiple rings without the bulk. The key is keeping each design different — mix thick bands with thin vines, add small leaves to break up solid lines. This works because it mimics how people actually stack rings, and the negative space between your fingers prevents the design from looking cluttered.
20 Popular Matching Sister Tattoos Designs

28 Elegant Hairstyles For Women Above 50 to Try This Year
30 Best Glitter Mehndi Designs You will Love
30 Most Popular Dubai Street Style Fashion Ideas
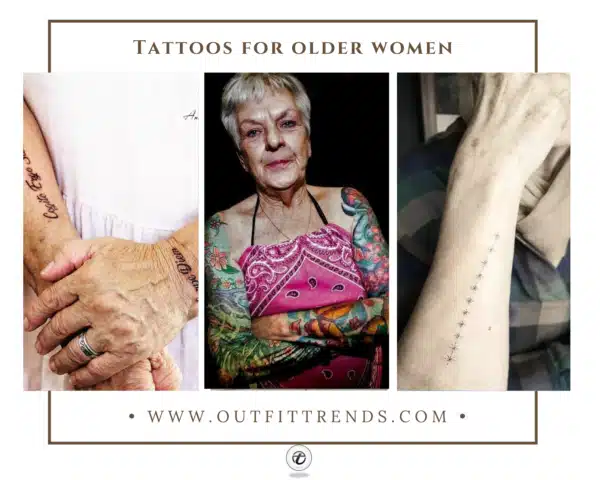
20 Best Tattoos Designs For Older Women
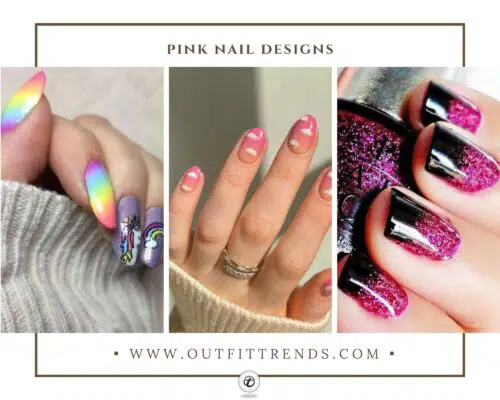
20 Cute Pink Nail Designs You Must Try
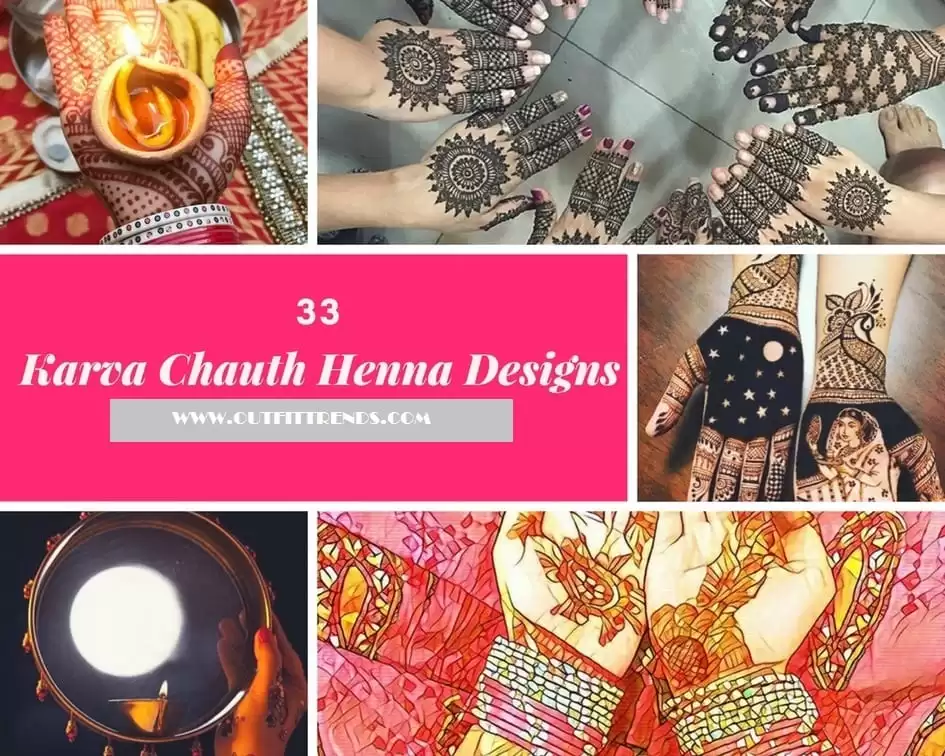
33 Best Karva Chauth Mehndi Designs with Video Tutorial
40 Best Indian Mehndi Designs For Hands This Season
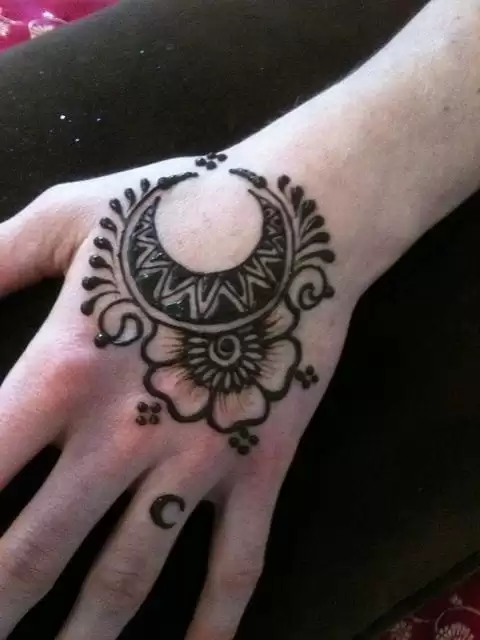
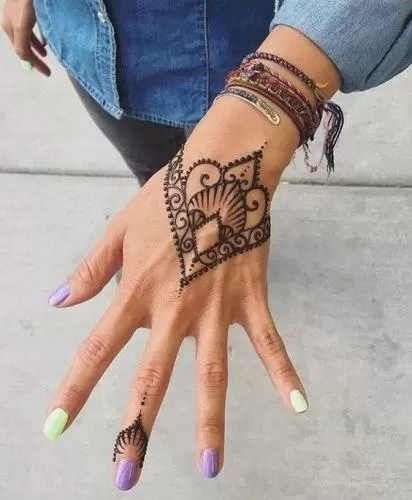
Centre bold motifs on your palm
A single statement design in the middle of your palm reads like intentional body art rather than traditional mehndi. The circular mandala shape here works because it follows the natural curves of your hand — your palm creates a perfect frame. This placement also means the design stays visible when you’re holding things, unlike intricate finger work that gets hidden.
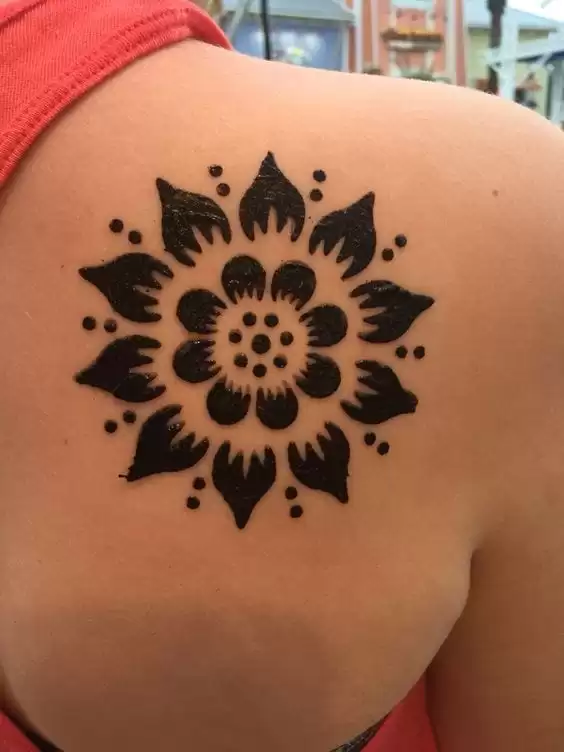
Use your shoulder as a canvas
Your shoulder blade is the perfect spot for larger, more geometric designs because it’s flat and rarely stretches the pattern. This mandala placement mimics where people actually get tattoos, and the size allows for bold, readable details. The key is choosing designs with strong outlines — delicate work gets lost on this larger area.
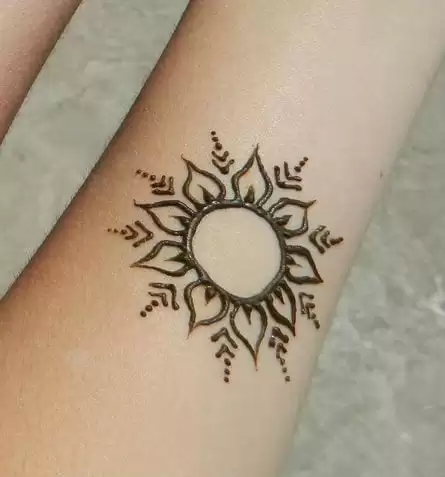
Try minimalist sun motifs
Simple sun designs work brilliantly as tattoo-style mehndi because they’re instantly recognisable even when scaled down. This wrist placement is strategic — it’s visible when you gesture but hidden when your hand is relaxed. The rays extending outward create movement that follows your arm’s natural lines rather than fighting them.
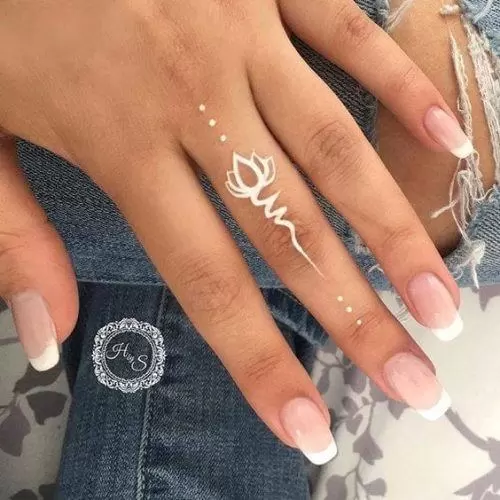
Experiment with white henna accents
White henna over traditional brown creates dimension that flat designs can’t match. This finger design demonstrates how white can highlight specific elements — the lotus outline pops while the traditional henna provides depth. The combination reads more like contemporary body art because it uses contrast the way modern tattoos do with black and white ink.
Dos & Don’ts
White henna isn’t actually henna at all — it’s temporary body paint made from cosmetic-grade ingredients that sits on top of your skin rather than staining it like traditional henna does.
Best Body Placements for Tattoo-Style Mehndi
The biggest mistake I see is treating every body part the same way. Your wrist moves constantly, so choose designs that flow with the joint rather than rigid geometric shapes that crack when you bend. Shoulders handle bold, statement pieces because the skin stays relatively still, but fingers need designs that account for the constant stretching and contracting.
I’ve learned that placement determines longevity more than design complexity. Areas that rub against clothing or get washed frequently — like your palms — fade fastest regardless of how well you care for them. If you want your tattoo-style mehndi to last, choose spots that stay protected: the back of your hand, your forearm, or your shoulder blade.
The golden rule is simple: if you wouldn’t put a real tattoo there, don’t put henna there either. This means avoiding areas that stretch dramatically (like over joints), get constant friction (like palms), or rarely see daylight (like under your arms). Think like a tattoo artist — they choose locations that showcase the art, and you should too.
Simple and Elegant Mehndi Designs
Arrow and Geometric Body Art
This minimalist arrow design paired with geometric dots creates a modern take on traditional mehndi that works perfectly for festival season. The clean lines and simple motifs make it ideal for beginners who want something meaningful without overwhelming detail. The placement along the forearm makes it visible yet professional enough for most workplaces.

Tip: Green henna creates a unique color that photographs beautifully against darker skin tones and adds an unexpected twist to classic brown designs.
Small Mandala Foot Design
A compact circular mandala on the foot offers the perfect introduction to mehndi for those testing the waters. This size works beautifully for anyone who wants to try body art without a major commitment, and the foot placement means you can easily cover it with shoes when needed. The symmetrical pattern creates a balanced look that complements both casual and dressy footwear.

Tip: Foot designs fade faster due to washing and friction, making them perfect for temporary experiments with mehndi artistry.
Intricate Back Neck Mandala
The back of the neck provides an ideal canvas for detailed mandala work that creates a striking focal point when hair is worn up. This placement works especially well for special occasions and formal events where you want to make a statement. The design’s complexity and positioning make it feel more like permanent jewelry than temporary body art.

Tip: Back neck designs look most impressive with updos or ponytails, so plan your hairstyle to showcase the intricate details.
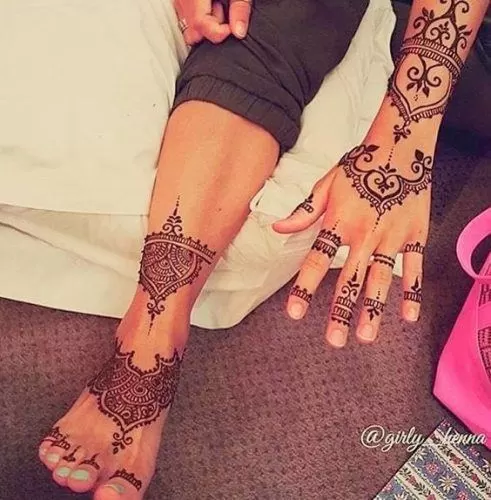
Palm and Finger Combination
Centering a heart motif on the palm while extending delicate patterns onto the fingers creates a cohesive design that moves naturally with your hands. This style works particularly well for those who use their hands expressively when speaking, as the design becomes part of your gestures. The combination of bold central elements with fine finger details offers visual interest from multiple angles.
Tip: Palm designs fade quickly due to constant use, so apply this pattern just before your event for the darkest, most defined result.
Dramatic Back and Neck Coverage
This extensive back design transforms the entire upper body into a canvas for intricate geometric patterns that create an almost lace-like effect. The design works best for special occasions where you’ll be wearing backless or low-back clothing that showcases the artistry. The detailed dotwork and layered patterns require significant time investment but deliver maximum visual impact.

Tip: Large back pieces require help with application and aftercare, so plan to have someone assist you with the initial design and moisturizing routine.
Bold Statement Designs
Matching Hand Bracelets
Coordinating bracelet-style designs across both hands creates a balanced, intentional look that mimics expensive jewelry without the cost. The geometric patterns and consistent weight make this style perfect for formal events where you want polished, symmetrical beauty. This approach works especially well when wearing sleeveless or short-sleeved clothing that shows off the complete design.
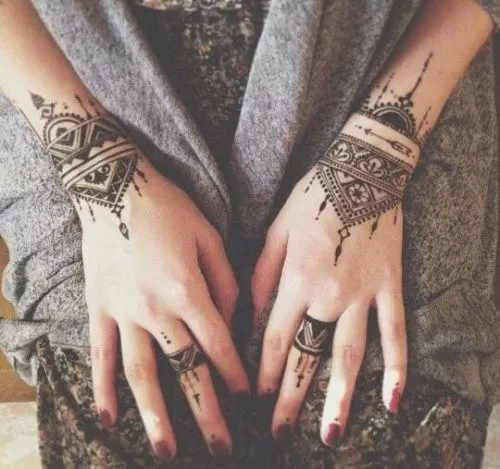
Tip: Keep both hands positioned similarly during application to ensure the designs align properly and create a truly matched set.
Flowing Forearm Vine
A single elegant vine pattern flowing up the forearm creates movement and grace that complements natural arm gestures. This organic design works beautifully for those who prefer curved, flowing lines over geometric precision. The length and placement make it visible in most clothing while remaining workplace-appropriate in conservative environments.
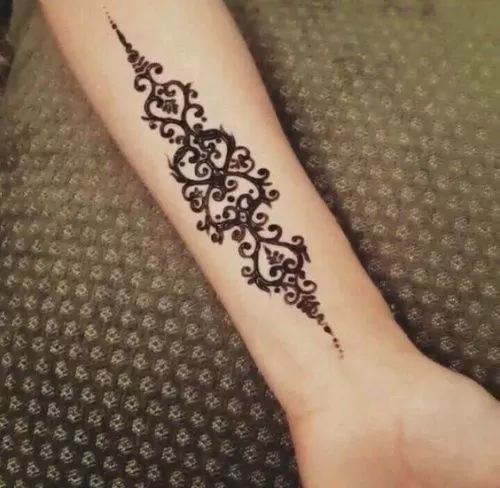
Tip: Vine patterns look most natural when they follow the natural curves of your arm, so work with your artist to customize the flow to your body.
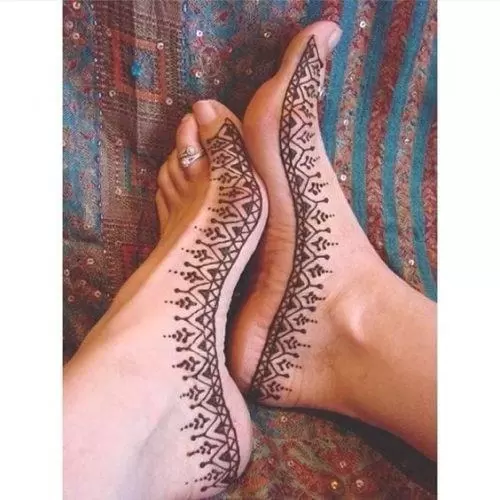
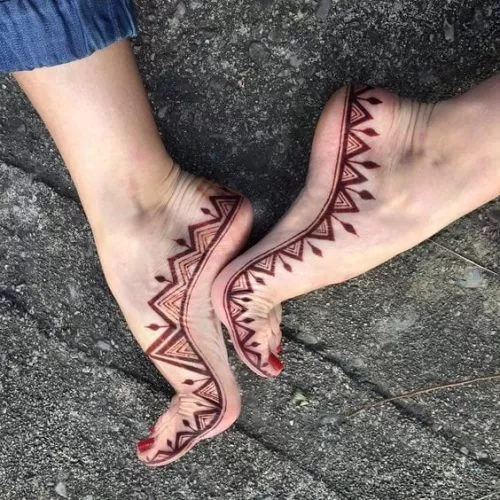
Detailed Foot Jewelry
Elaborate foot designs that extend from ankle to toes create the illusion of ornate jewelry that’s perfect for sandal season and beach occasions. The intricate patterns work especially well for weddings and summer festivals where feet are prominently displayed. This placement allows for maximum creativity since feet provide a large, relatively flat canvas for detailed work.
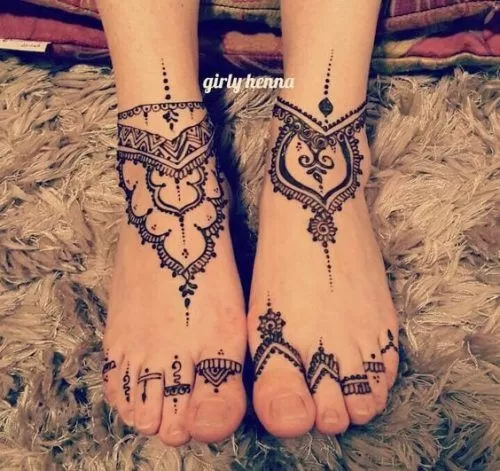
Tip: Foot designs require extra drying time since feet are more prone to smudging, so plan for extended sitting time during application.
Linear Hand Pattern
Sharp, linear designs that emphasize finger length create a modern, architectural approach to traditional mehndi. This geometric style works particularly well for those with longer fingers and suits minimalist fashion aesthetics. The repetitive elements create rhythm and visual interest without overwhelming the hand’s natural proportions.
Tip: Linear patterns require steady hands and precision, so choose an experienced artist who specializes in geometric work for the cleanest results.
Symmetrical Leg Designs
Matching patterns on both legs create a cohesive look that works beautifully with shorts, skirts, and dresses during warm weather. The tribal-inspired motifs offer a bohemian aesthetic that pairs perfectly with casual summer styling. This placement allows you to show off the artwork while swimming or at beach events where other body art might not be practical.
Tip: Leg designs require careful attention to symmetry during application, so have your artist mark reference points on both legs before beginning the detailed work.
Bold Mandala Foot Design with Feather Accent
This striking design combines a large mandala on one foot with a delicate feather pattern on the other, creating perfect asymmetry. The contrast between geometric circles and flowing organic lines makes each foot a statement piece while maintaining visual balance. Perfect for beach weddings or summer festivals where you want your feet to be the focal point.
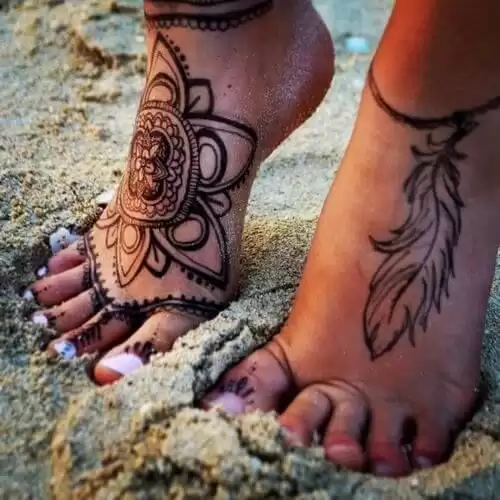
Tip: When doing contrasting foot designs, keep the line thickness consistent between both patterns to maintain visual harmony.
Wraparound Ankle Mandala
A circular mandala positioned perfectly on the ankle bone creates a natural bracelet effect that flatters the curve of your leg. The detailed petals and geometric center draw the eye upward, making legs appear longer and more defined. This placement works beautifully with both heels and flat sandals, adapting to any summer outfit.
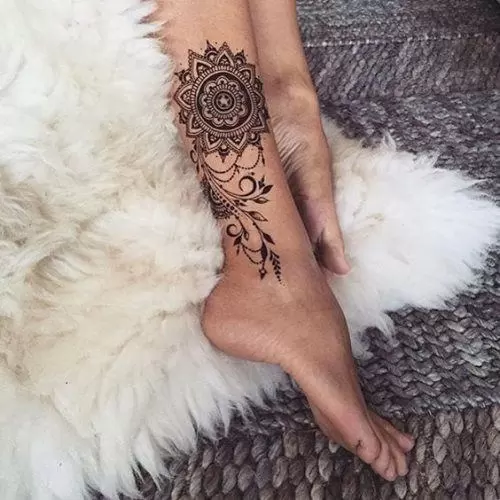
Tip: Position the mandala center slightly above the ankle bone to avoid distortion when your foot flexes.
Geometric Wave Pattern Across Both Feet
Sharp zigzag patterns flow continuously from one foot to the other, creating a cohesive design that treats both feet as a single canvas. The bold triangular motifs have an almost tribal energy that works perfectly with boho outfits or festival wear. The strong geometric lines create definition and structure, especially flattering on wider feet.
Tip: Practice the zigzag pattern on paper first to ensure consistent angles and spacing when applying across both feet.
Intricate Leg and Hand Coordination
Matching ornate patterns on both hands and legs create a coordinated bridal look that feels intentional and complete. The detailed paisley and floral motifs showcase traditional craftsmanship while the consistent line weight ties all elements together. This level of coverage works best for special occasions where mehndi is the main attraction.
Tip: Use the same artist for all pieces to ensure consistent line quality and design flow between different body parts.
Minimalist Finger Bands and Geometric Accents
Clean lines create ring-like bands around each finger with small geometric shapes filling the spaces between. This modern approach to mehndi feels fresh and contemporary while still honoring traditional techniques. Perfect for daily wear since the design is subtle enough for professional settings but interesting enough for casual outings.
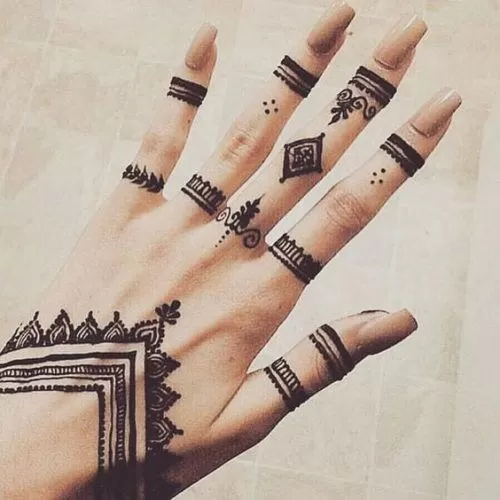
Tip: Keep finger designs simple with bold lines since fine details get lost as the henna fades over time.
Extended Forearm Statement Design
A complex pattern flows from wrist to elbow, creating an artistic sleeve effect that transforms your arm into a canvas. The mix of floral and geometric elements keeps the eye engaged while the flowing composition follows the natural curve of your arm. This dramatic coverage works best with sleeveless tops or rolled-up sleeves that show off the full design.
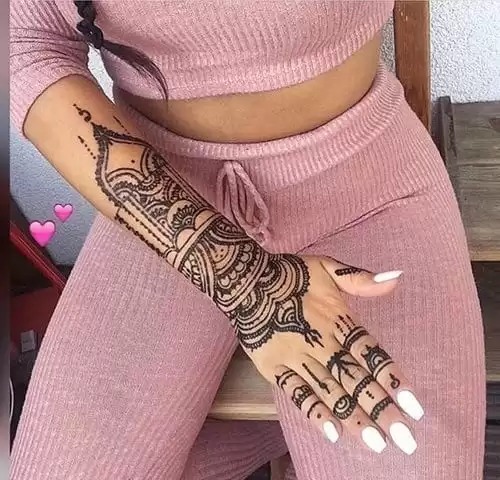
Tip: Plan the design flow from wrist upward to ensure the pattern follows your arm’s natural movement and looks graceful from all angles.
Yin Yang Sun Design on Forearm
A creative fusion of Eastern philosophy and traditional mehndi creates this unique sun-inspired yin yang symbol. The flowing rays and decorative swirls add movement to what could be a static design, while the forearm placement makes it visible and conversation-starting. Perfect for those who want meaningful symbolism in their body art.
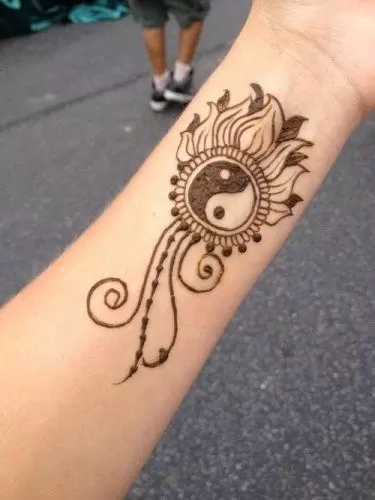
Tip: Center circular designs like this over the widest part of your forearm to create the most balanced and proportional appearance.
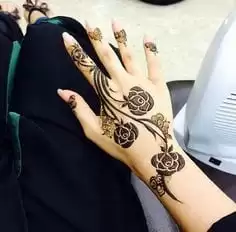
Delicate Rose Vine Hand Pattern
Flowing rose vines with thorny stems create a romantic garden aesthetic across both hands. The organic curves follow the natural lines of your hands and fingers, while the detailed roses add focal points that draw attention. This feminine design works beautifully for romantic occasions or when you want something pretty but not overpowering.
Tip: Start the vine design from your wrist and let it flow naturally upward to create the most organic and graceful movement.
Simple Tree of Life Forearm Design
A single tree with elaborate swirling branches creates powerful symbolism in a clean, uncluttered design. The curved trunk and flowing branches work with your arm’s natural shape, while the intricate branch details provide visual interest without overwhelming the overall composition. Perfect for first-time mehndi wearers who want something meaningful but manageable.
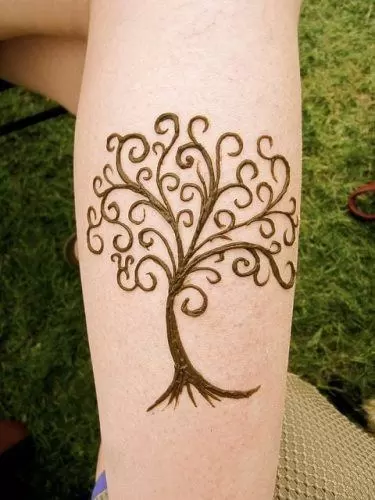
Tip: Position the tree base toward your wrist so the branches can spread naturally upward following your arm’s length.
Ornate Upper Arm Cuff Design
An elaborate pattern wraps around the upper arm like an ornate cuff bracelet, with intricate paisley and dotwork creating depth and texture. The band placement frames the arm beautifully while the detailed interior patterns reward close inspection. This placement works perfectly with tank tops or off-shoulder styles that showcase the full design.
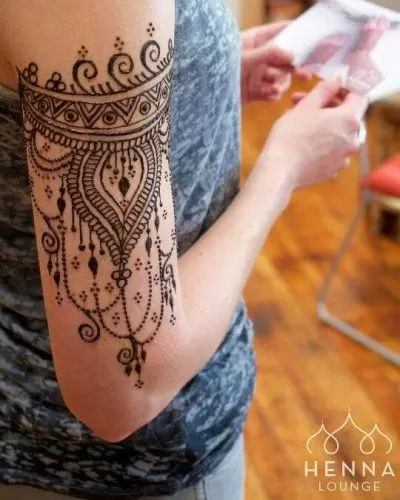
Tip: Use a consistent band width around your arm and fill with patterns of varying density to create visual rhythm without chaos.
Intricate Thigh Mandala with Spiral Details
This bold thigh placement transforms the upper leg into a canvas for an elaborate mandala design featuring spiraling patterns and circular motifs. The intricate detailing creates a stunning focal point that works beautifully with shorts, mini skirts, or swimwear. Perfect for someone who wants their mehndi to make a statement and isn’t afraid of commitment to a larger design.
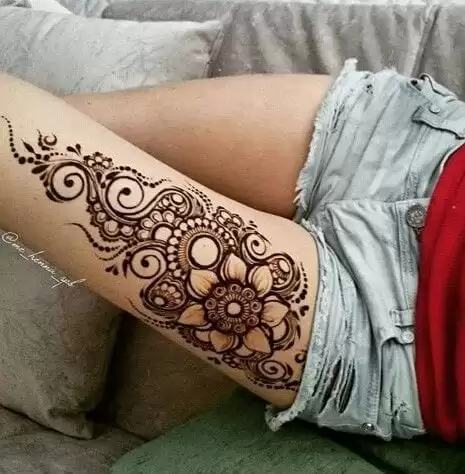
Tip: Thigh designs need at least 3-4 hours to complete properly, so book accordingly and wear comfortable, loose clothing to your appointment.
Asymmetrical Hand Pair with Sun and Moon Theme
These complementary hand designs showcase how asymmetrical mehndi can be more striking than matching patterns. One hand features a radiating sun motif with flowing curves, while the other displays delicate moon and star elements with geometric precision. This approach works perfectly for brides who want coordinated but not identical designs.

Tip: Plan asymmetrical designs by choosing one dominant hand for the more detailed pattern and keeping the other slightly simpler for better visual balance.
Ornate Feather Design on Forearm
This detailed feather pattern stretches elegantly along the forearm, incorporating traditional paisley elements with modern linear details. The design’s vertical flow creates an elongating effect on the arm while the intricate internal patterns showcase advanced mehndi artistry. Ideal for someone wanting a piece that reads as both bohemian and sophisticated.
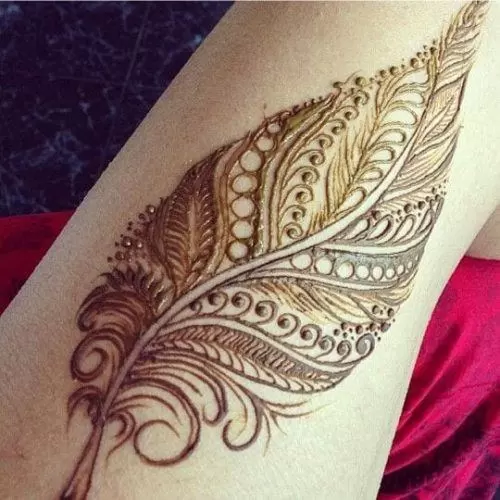
Tip: Forearm designs like this photograph beautifully and are perfect for showing off in sleeveless outfits or when rolled up sleeves.
Full Hand Coverage with Paisley and Floral Fusion
This comprehensive hand design combines traditional paisley motifs with delicate floral elements, creating a rich tapestry that extends from fingertips to wrist. The varying pattern densities and the mix of bold outlines with fine detailing demonstrate masterful mehndi technique. Perfect for special occasions when you want maximum visual impact.
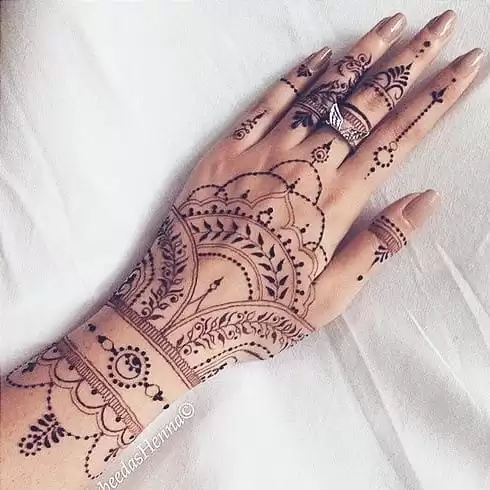
Tip: Full coverage designs require the longest healing time, so avoid water and friction for the first 12 hours to ensure the darkest possible stain.
Key takeaways
- Choose placement based on your lifestyle — hands fade fastest while arms and legs hold color longer
- Book 2-4 hours for intricate designs and wear loose, dark clothing to your appointment
- Mix traditional motifs with modern elements to create personalized designs that feel both timeless and current
- Consider asymmetrical pairs instead of matching designs for more visual interest and artistic appeal
- Plan your mehndi 2-3 days before events for the darkest stain and best appearance
- Protect fresh mehndi with lemon-sugar sealing and avoid water for 12 hours minimum
20 Popular Matching Sister Tattoos Designs
28 Elegant Hairstyles For Women Above 50 to Try This Year
30 Best Glitter Mehndi Designs You will Love
30 Most Popular Dubai Street Style Fashion Ideas
20 Best Tattoos Designs For Older Women
20 Cute Pink Nail Designs You Must Try
33 Best Karva Chauth Mehndi Designs with Video Tutorial
40 Best Indian Mehndi Designs For Hands This Season

")

